Easy methods to create a bootable USB/Flash drive drive manually, the Windows default program will be Command Prompt needed for this purpose. Here is how to make a bootable USB drive a step-by-step guide to using the Windows installation media. To create a bootable USB drive as a Windows installation media we need at least 4-8 GB of space for minimum size for Windows 10. A large capacity of a USB drive is always better to make it bootable. It is important to note that at this moment the USB flash drive with a capacity of 29 GB is only an example.
Step 1: DISKPART Command to Create USB Pen Dive Bootable
- Plug in your USB flash drive to the computer that you have started. First, we must open Command Prompt in administrator mode. To do this we first have to look for cmd by typing ‘cmd’ in the search bar of Windows Start Menu. When Google search brings out ‘cmd’, right-click it and select ‘Run as Administrator’. Follow the process and steps below to create a bootable USB/Flash drive on Windows operating system.
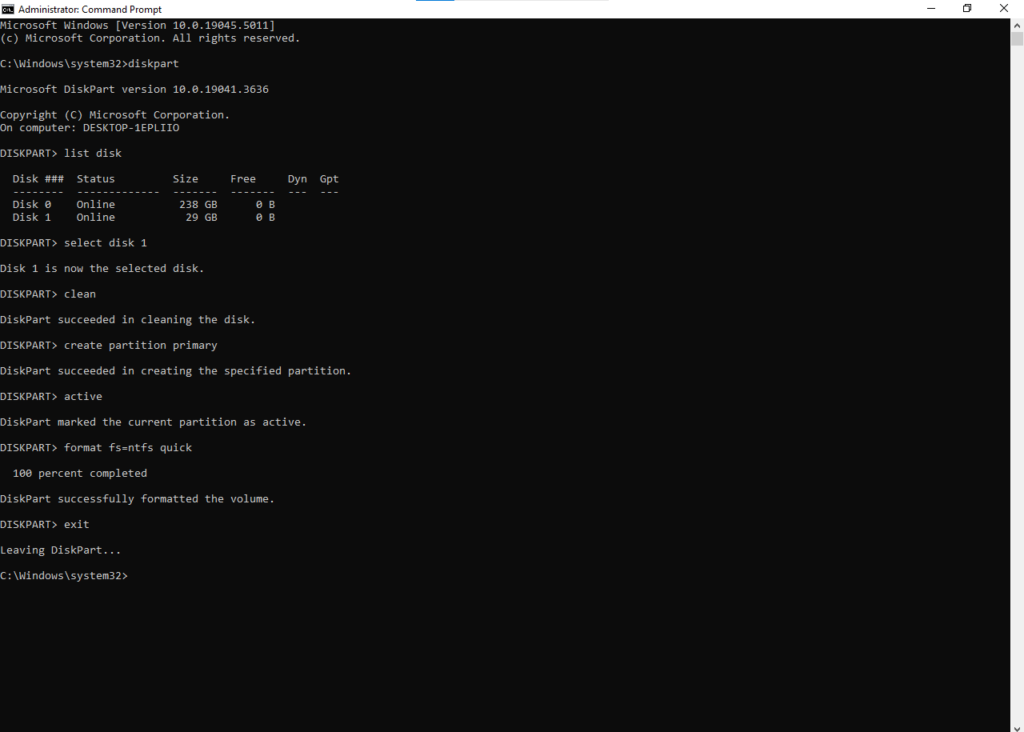
- In the CMD box write ‘diskpart’ there and press enter. Wait for a while until your DISKPART program runs.
- Input ‘list disk’ then press Enter to display all active disks on that particular computer. It will be observed that the Disk-owning activity is labeled ‘Disk 0′ for the hard drive. ‘Disk 1′ for your USB flash drive along with its capacity.
- Input ‘select disk 1’ which would show that ‘disk 1’ would be worked on on the next step and press Enter.
- Insert ‘clean’ and then press the enter button to delete the entire data from the selected input drive.
- Then you need to type ‘create partition primary’ and then press ‘Enter’. Making a primary partition is further defined by Windows as ‘partition 1’.
- Enter ‘select partition 1’ and hit ‘Enter’. Deciding on the ‘partition 1’ for setting it up as the active partition.
- After that type ‘active’ and press ‘Enter‘. Activating the current partition.
- Hyper hit ‘format fs=ntfs quick’ Formatting the current partition NTFS file system almost instantly.
- Type ‘exit’ and hit Enter. Leaving the DISKPART program but not exiting the Command Prompt rather continuing to it. We still needed it for the next process.

Step 2: Boot Sector? How to Create Boot Sector and Create a bootable USB/Flash drive
Now let’s assume that the USB pen drive is a ‘D’ drive and the DVD installer is located on the ‘F’ drive. The very task we have to perform is to navigate Command Prompt to set DVD installation as its active directory.
- So, since the beginning, the Command Prompt’s active directory for Admin Permission is set to C:\Windows\System32>. Now we have to navigate Command Prompt to set on the DVD (F:) as it is an active directory. Now you can type ‘F’ and hit Enter, this will change the active directory to F: drive.
- Now type ‘cd boot‘ and hit the button ‘Enter’. This process will change your active directory to F:\boot>.
- Now to create a boot sector on D: drive you have to type in the command ‘bootsect/nt60d:‘ and hit ‘Enter’.
- Now you have to type ‘exit’ and hit the Enter key to close the CMD box (Command Prompt). Now after this step, we have a bootable USB drive, and the pen drive is ready that we can use as boot media.
Step 3: Let’s know about how to proceed to Copying Installation Files
- Just to install Windows from a pen drive that is bootable, all we have to do is copy the installation files that are contained on the DVD installer to a pen drive. To perform this task all you have to do is open the Command Prompt box as we opened it earlier by following the steps mentioned above.
- Once the CMD box is open type ‘xcopy f:\.*d:\/E/H/F‘ and hit the Enter key. Wait for all the files to be copied from the DVD installer to the pen drive. Once the file transfer is complete to 100%. This means your pen drive is ready to install Windows from a USB Flash Drive.
Summary:
At ITPressHub you have learned today about how to create a bootable USB/Flash drive on Windows OS. Simple steps and methods are covered in above sections. Easy fix the issue if facing problem related to pen drive cannot be bootable by following the explained steps.
To know more about Types of BSOD Errors

